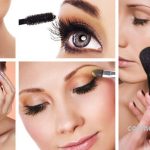
4 Easy Steps To Apply A Highlighter


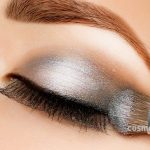
Makeup is an art and it is difficult to do but very easy for professionals makeup artist. Use of Highlighter and illuminate in your daily routine make up is a great way to glow and shine your skin. Highlighter can make your eyes look brighter and lips appear fuller and the contours your cheekbones as always.
Best tip of using highlighter is to highlight always top of cheekbones,the bridge of nose and eyelids and inner corner of eyes. Always remember that use a small amount in the most natural light possible. Apply highlighter with your finger tips and then use a small fluffy eye shadow brush to blend it. A color of highlighter is also very important and difficult to choose. If you have fair skin tone, use it with bit more silver it look pop-evening style. Darker skin tones usually use a bit more gold or peach highlighter for a natural look Lets read these 4 Easy Steps To Apply A Highlighter briefly.
4 Easy Steps To Apply A Highlighter

Before:
A fully mattifying face tends to lead to skin that looks flat and dull, as shown here. To revitalize the skin, it is important for a multidimensional aspect added highlights to certain areas.
 Step #1
First of all, choose a liquid highlighter with golden underlying which should opposed to as silver touch. You can use Chanel Soleil Tan De Chanel Sheer Illuminating Fluid. Champagne colored and bluish gray can be look glacial but this golden highlights can give you the glamorous look. Liquid formulas are recommended because they do not sink into pores like other powders or creams. Chanel Foundation Brush #6 is recommended as your application tool because of its handling. First dip the tip of your foundation brush in Chanel’s Liquid highlighter and apply it down to the center of your nose and round the brush tip out, to avoid the harsh stripe you need to blow it out at the end of your nose.
 Step #2
Then, draw dots with highlighter on the top of cheekbones to make your cheeks prominent.

Step #3
There is no such reason really but the left side of everyone’s seems to be twinkle more, so always use the highlighter on your right side of forehead, which will prevent one area from looking greasy.
 Step #4
In the end, use the highlighter to the center of your chin to add some luminosity. and then apply a little color on the cheeks by pushing a touch of cream blush on the top of the highlighter.

Final Look
This is the way you would look if you followed the steps correctly and with same products which i have mentioned in the steps.
![Unveiling the Secrets to Flawless Bridal Makeup in Pakistan]()
Unveiling the Secrets to Flawless Bridal Makeup in Pakistan
Prepare to embark on a journey into the intricate ...![Best-Lipstick-Colors-For-Winter-Season-001.jpg]()
Best Lipstick Colors For Winter Season
![2 Easy Ways To Find Your Face Shape Yourself]()
2 Easy Ways To Find Your Face Shape Yourself
Here we are giving you few steps to find your ...![7 Effective Makeup Tips To Brighten Your Eye Shadow 1]()
7 Effective Makeup Tips To Brighten Your Eye Shadow
Here in this post you will find 7 effective m...![Top 5 Recipes Of Skin Care 001]()
Top 5 Recipes Of Skin Care
In this post we are going to share with you t...![10 Best Makeup Tips To Look Beautiful In Pictures]()
10 Best Makeup Tips To Look Beautiful In Pictures
Do you often wonder to see yourself in photog...![How To Make Concealer At Home: Useful Tips]()
How To Make Concealer At Home: Useful Tips
Here is a useful steps to make your own conce...![Blackheads-Removal-Methods-With-Egg-White-001.jpg]()
Blackheads Removal Methods With Egg White